Sales & Returns

Method 1: Pull-API - Fixed RFID POS Reader Pads Method 2: Senitron POS Assistant (windows app) Method 3: Senitron POS Assistant (web-based app | Lightspeed) Method 4: Push API – Via Senitron Hand-Held RFID Scanner Method 5: Commit Sales / Returns to Cloud-Endpoint (RFID POS) Method 6: Commit Sales / Returns to Cloud-Endpoint (External Software) Note: The best practice methods are Method(s) 1  and 4

Method 1: Pull-API - Fixed RFID POS Reader Pads

Any external software, on the same local network, can utilize the Senitron POS Service API, to read tags, and commit transactions. For example, External POS apps, may add an RFID scan button to read RFID tag(s)/Label(s) via this Senitron service. The POS Service has a simple HTTP REST API available for communication, based on HTTP verbs, and configuration values passed as part of the URL path. Available commands:

  • Start Reader
  • Stop Reader
  • Get Reader status
  • Pull current reads
  • Clear current reads
  • Commit transaction

Configuration required data:

  • Store location (optional - depreciated, no longer needed, any value can be used)
  • Client ID (optional - depreciated, no longer needed, any value can be used)
  • Rfid Reader ID
  • Transaction type
METHOD: POST URL: /api/pull/start/{location}/{deviceId}/{clientId}/{transactionType} RESPONSE: 200 -> OK 404 -> Error, reason included in the response body To start a reader, make new HTTP request with “method” POST, you need to keep track of the reader state internally, as the POS Service assumes this will be the case to allow better control of the readers. Example: POST: http://localhost:8889/api/pull/start/001/1000/0/0 Note: localhost will usually be replaced with the IP address of a Senitron machine the same network. There for the post example will be http://192.168.2.20:8889/api/pull/start/001/1000/0/0
METHOD: POST URL: /api/pull/stop/{location}/{deviceId} RESPONSE: 200 -> OK 400 -> Error, no active session for the reader 404 -> Error, reason included in the response body To stop a reader, make new HTTP request with “method” POST. Example: POST: http://localhost:8889/api/pull/stop/001/1000
METHOD: GET URL: /api/status/{location}/{deviceId} RESPONSE: 200 -> OK, JSON object in the body with the reader status string 400 -> Error, no active session for the reader 404 -> Error, reason included in the response body To retrieve the current status of a started reader, make new HTTP request with “method” GET, the response body contains a JSON object, you can directly display to present the current reader status. Example: GET: http://localhost:8889/api/status/001/1000 RESPONSE: { "status": "Waiting for reader 10…" } OR: { "status": “Reader 10 Connected." } OR: { "status": “Error starting reader 10." }
METHOD: GET URL: /api/pull/{location}/{deviceId} RESPONSE: 200 -> OK, JSON object in the body with the reader status string 400 -> Error, no active session for the reader 404 -> Error, reason included in the response body To retrieve the currently read tags, make new HTTP request with “method” GET, if the specified reader is active, the response will contain an array of objects that include: Epc, Upc, Qty. Example: GET: http://localhost:8889/api/pull/001/1000 RESPONSE: [ {"Epc":"000000000000000000000341","Upc":"999999","Qty":1}, {"Epc":"126000000000000000000060","Upc":"999999","Qty":1}, {"Epc":"126000000000000000000471","Upc":"999999","Qty":1} ]
METHOD: POST URL: /api/pull/clear/{location}/{deviceId} RESPONSE: 200 -> OK 400 -> Error, no active session for the reader 404 -> Error, reason included in the response body To clear the currently read tags, make new HTTP request with “method” POST. Example: POST: http://localhost:8889/api/pull/clear/001/1000
METHOD: POST URL: /api/transaction/commit RESPONSE: 200 -> OK 400 -> Error, committing the transaction To commit a new transaction to the POS Service and get it uploaded, make new HTTP request with “method” POST, you will have to generate the transaction JSON structure expected, and send it on the request body marked with “content-type” to “application/json”. The transaction object needs to set the transaction type in both the “Name” and “TransactionMode” property, the location from your settings should be set on the “Location” property, if you have access to the amount for the items in the transaction, populate the “Total” property with the sum of the item’s prices; for the “Count” field you need to set the quantity of items in the transaction. NOTE: All the fields shown in the example request should be set, and if there’s no data to fill them, use placeholder values like we do in the example. Example: POST: http://localhost:8889/api/transaction/commit BODY: { "Name": "Sale", "Currency": "USD", "Location": "001", "TenantKey": "4", "Total": "0.00", "Reference4": "50", "DocumentId": "", "Id": "1", "Date": "2018-08-17 01:56:27", "Count": 5, "TransactionMode": "Sale", "TransactionDetails": [ { "Attr1": "", "Attr2": "", "ProductDesc": "", "ProductId": "117440512", "UnitPrice": "", "SalePrice": "", "EpcId": "307510BBC000000000000003", "ItemNo": "117440512" } ] }

Method 2: Senitron POS Assistant (windows app)

The Senitron POS Assistant, Windows App, is an independent software which sits on top of the typical POS UI, and allows the users to click the Sales button, to have the app read items via a fixed-tabletop-RID-reader. The read items,  populate on to the POS assistant app, and at the same time into the POS UI, using Windows Targeting mechanisms. 
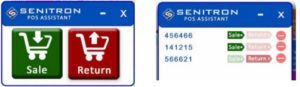
Once items are sold or returned using the app & tool, both Senitron and POS / External system will decrease/increase their quantities in parallel, keeping the inventories properly in SYNC. There are Pro's and Con's of using this app. The benefit is that, any company can quickly start using RFID with their POS/external system, with out having to do integrations. The disadvantage is that this method, is more prone to human error, where the personnel, may not have the POS ready to accept the RFID reads, and or the users can circumvent using the POS assistant, and may just ring up items on the POS as a normal barcode system (end-effect is that Senitron will fall out of sync with the POS system's inventory)  (Method 1 which is an more in-depth integrated method is always perfected when possible, and would especially be very effective if the POS / external software makers, blocks any methods where the users can try to circumvent POS RFID reading for sales and returns.

Method 3: Senitron POS Assistant (web-based app | Lightspeed)

The web-based Senitron POS Assistant app, is a quick way for web-based applications, such as Lightspeed POS, and others to quickly send users to the RFID UI, so that RFID reads can take place, and once finalized, the users are sent back to their web-based programs (like Lightpseed) at which time, the data which was read via RFID is committed back via API's to the external app, and populated on to the screen of the external app. Video Demo  https://www.youtube.com/watch?v=0ZMEvsdSWJQ

Method 4: Push API – Via Senitron's Hand-Held RFID Scanner

(new pending feature - to be released Summer 2020) Any POS app or external app,can get reads directly from the Senitron Handheld RFID scanner. The Hand-scanner can sit in its cradle or be picked up, by personnel, to scan items directly into the POS. Technical Details: The external software/POS can send an API message to the handheld middle-ware service running on the Windows based computer, to activate RFID reading on the hand-held, and to get the reads back to POS sales UI. Once committed on the POS, it must commit back directly to Senitron cloud API end-point.

Method 5: Commit Sales / Returns to Cloud-Endpoint

Once any external system, uses any one of the mentioned methods to read RFID data, once the transaction is completed the external system can send the data to Senitron cloud, mark those items are sold (aka removed from inventory) or returned (added back into the inventory)  Note: depending on the method, this process may also be handled elsewhere in the other processes.  (f0r example client that use the POS assistant in conjunction with the CDM. POS Assistant will commit back to the CDM, and the CDM will commit back the cloud automatically)

Commit Sales / Return | Endpoint

METHOD: POST

URL: {tenant}/{location}/api/v1/sale?key={api_key}
BODY: JSON Object containing the transaction information

RESPONSE:
200 -> OK
404 -> Error, reason included in the response body

To send a sale transaction, make a POST request to the sale endpoint for the destination tenant / location. And attach in the body
of the request the raw JSON containing the transaction data.

The name field is how Senitron recognizes the type of transaction. Thus send in the name field Sale, or Return

POST
https://app.senitron.net/{tenant}/{location_number}/api/v1/sale?key={key}

BODY
{
"Name": "Sale",
"Currency": "USD",
"Location": "001",
"TenantKey": "4",
"Total": "0.00",
"Reference4": "10",
"DocumentId": "",
"Id": "1",
"Date": "2018-10-24 01:24:06",
"Count": 5,
"TransactionMode": "Sale",
"TransactionDetails": [
{
"Attr1": "",
"Attr2": "",
"ProductDesc": "",
"ProductId": "122454201","UnitPrice": "",
"SalePrice": "",
"EpcId": "307510BBD3202E4000000054",
"ItemNo": "122454201"
}
] }

Method 5 - New: Transaction General API / Push Sales Orders to Cloud-Endpoint

Once any external system, uses any one of the mentioned methods to read RFID data, once the transaction is completed the external system can send the data to Senitron cloud, mark those items are sold (aka removed from inventory) or returned (added back into the inventory)  Note: depending on the method, this process may also be handled elsewhere in the other processes.  (f0r example client that use the POS assistant in conjunction with the CDM. POS Assistant will commit back to the CDM, and the CDM will commit back the cloud automatically)

Push Sales Orders | Endpoint

Service Name        Push sales orders to Senitron
Service Method     POST
Service URL           /<tenant-code>/<location>/api/v1/sales

Request Parameters
api_key = <api_key>

Request Header Fields
Content-Type = application/json

Request Data
{
"transaction_type": "Sale",
"transaction_date": "11/27/2024 01:45 PM",
"transaction_number": "45001",
"title": "SO Test #45001",
"customer": "",
"reference_number": "",
"document_number": "",
"user": "api@senitron.net",
"note": "",
"zone": "Inside Zone A",
"catalog_update": false,
"inventory_update": false,
"items": [

{
"item_number": "210000000062",
"qty": 10

},
{

"item_number": "210000000040",
"qty": 20

}
],
"assets": [

{
"epc": "C000C30E4F9B43E0000004EA",
"serial_number": "1258",
"item_number": "210000000062",
"sku": "",
"upc": 3252355,
"alu": "",
"description": "FOOT JOY M OUTER-LS 215 - L -",
"price": 45.00,
"retail_price": 59.00 ,
"msrp": 57.00,
"qty": 1

},
{

"epc": "C000C30E4F9B4280000004E2",
"serial_number": "1250",
"item_number": "210000000040",
"sku": "",
"upc": 3252355,
"alu": "",
"description": "CUTTER BUCK M OUTER_VEST 105 - XXL -",
"price": 78.00,
"retail_price": 83.59 ,
"msrp": 81.59,
"qty": 5

}
]
}

Response Data
Status Code = 200
{
"message": "Sales order information has been received and will be saved in the cloud"

}

Response (Error)
Status Code <> 200
{
"error": {
"type": "LOCATION_NOT_FOUND",
"message": "The location #001 not found"

}
}

Method 6: Commit Sales / Returns to Cloud-Endpoint (External Software)

Posting to this API will update or create transaction records with the provided data. Send a POST request with a JSON body like in the example to update the record. Endpoint URL: https://app.senitron.net///api/v1/transactions/update?key=i39sjfu348957ndjk I.e.: https://app.senitron.net/democ10/001/api/v1/transactions/update?key=4882lks09390sjeok99 The request will respond with status 200 on success, and 400 on error, or 401 on unauthorized request. Required fields marked as such in the example below must be present on the JSON request. Optional fields can be omitted but must have a value if they are present at all.

Request body:
{
  "document_id": "183-642958",           // (REQUIRED) -> Ticket No / Transaction ID
  "zone":        "54, Sales Floor",      // (OPTIONAL) -> Audit location,
  "user":        "John Doe",             // (OPTIONAL) -> User name
  "user_email":  "john.doe@test.com",    // (OPTIONAL) -> User email
  "comment":     "Reason / notes",       // (OPTIONAL) -> Reason / notes memo from the audit
  "reference":   "6000",                 // (OPTIONAL) -> Misc. reference attached on transaction recorded
  "count":       2,                      // (REQUIRED) -> Count of items in transaction
  "total":       "25.00",                // (OPTIONAL) -> Total amount of sale transaction
  "currency":    "USD",                  // (OPTIONAL) -> Transaction currency
  "date":        "2020-05-14 11:51:55",  // (OPTIONAL) -> Transaction date & time
  "transaction_details": [
    {
      "epc":         "3074D89E04D99E7503C1A452",   // (OPTIONAL) -> RFID Tag EPC
      "serial":      "8309",                       // (OPTIONAL) -> Serial
      "product_id":  "1271417",                    // (REQUIRED) -> Catalog Product ID / Item Number
      "count":       2,                            // (REQUIRED) -> Product Qty
      "upc":         "1271417",                    // (OPTIONAL) -> UPC
      "description": "Shimmer Lettermen Hood",     // (OPTIONAL) -> Catalog Item description
      "price":       "19.00",                      // (OPTIONAL) -> Catalog Item price
      "comment":     "Reason / notes"              // (OPTIONAL) -> Item notes
    },
    {
      "epc":         "3074D89E05372DF5038345AA",   // (OPTIONAL) -> RFID Tag EPC
      "serial":      "8311",                       // (OPTIONAL) -> Serial
      "product_id":  "1367223",                    // (REQUIRED) -> Catalog Product ID / Item Number
      "count":       1,                            // (REQUIRED) -> Product Qty
      "upc":         "1271417",                    // (OPTIONAL) -> UPC
      "description": "Classic Lettermen Tee",      // (OPTIONAL) -> Catalog Item description
      "price":       "6.00",                       // (OPTIONAL) -> Catalog Item price
      "comment":     "Reason / notes"              // (OPTIONAL) -> Item notes
    }
  ]
}